In the beginning...
I had thought for some time about building a robot because all three of my children really loved watching the carnage each Friday night. My wife Jude had also suggested several times that I should have a go, but I wasn't too sure how or where to start. But always wanting a challenge I "bit the bullet" and joined the Robot Wars club in February 2000. For the first six months I bounced ideas of various people,
including my father, brothers, and friends. I was hoping my brothers would take
on some of the design work, but since we lived in different parts of England,
it was not easy to get things moving very fast. In the end I decided to do the
majority of design work myself, and bring other people in as-and-when required
later on. I didn't keep a diary until late August 2000 when the idea of
recording the ups and downs of building the robot sprung to mind. The first
entry therefore is a summary of the previous six months
progress.
Summary from February to August 2000
|
 |
|
 |
|
 |
|
 |
- 5 meters of rectangular metal box section tubing.
- Two channel Futaba radio transmitter & receiver.
- Various electrical components including power MOSFETs, opto isolators, AA sized NiCad batteries
Initial research
In the beginning, and with the absence of any hardware items at all, I surfed the Internet for information on how to build a robot. The official Robot Wars web site was full of information for those who wanted to watch the program or buy Robot Wars merchandise, but was not too helpful on the technical front. However, their saving grace was that they gave you links to other roboteer sites like Chaos 2, Razer, 101, Killerhurtz, Cassius II, etc. to name but a few in no particular order. These were of varying use, but from there I was able to gather more and more information.Radio controller
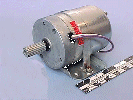
After deciding that I wanted to use electric motors as the main power devices, I looked at how I would control these from the radio gear. I knew that my brother Maurice was into radio controlled model aircrafts so asked him if he had a spare radio control transmitter and receiver he could loan to me. Fortunately he had one that he had never used, that he was willing to loan me on the understanding that he would have it back in one piece at some point in the future. The radio kit was a two-channel system that came from a glider. Although this would be enough to control forward/backward motion, and steering, it wouldn't allow any weaponry control. Having said that, it allowed me to start designing the motor control circuitry needed between the radio receiver and motors.Motor controller design
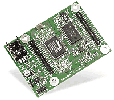
I spent some time in communication with Futaba via e-mail finding out about the signals given out by the receiver. I also spent some time researching on motor control circuits used to drive wheelchairs, golf caddies etc, so that I could integrate the two systems together. What I didn't want to do was have much in the way of mechanical devices between the receiver and motors, like some robot designers did. Some builders had a small electric server motor moving a joystick within the body of the robot. My idea was to use solid state all the way through from the receiver to the motors. The less fragile bits of mechanics I would use, the more reliability the robot would be (or so I hoped). To this end I decided to work on incorporating a micro-controller to do the reading of signals from the receiver, and the generation of pulses to the motors. I bought a single board micro-controller from Rabbit semiconductors that was based on the Z80 and Z180, but was faster and had an improved instruction set. The board had a number of nice features like plenty of I/O lines (40 of them), several timers, on board flash and ram. It also came with a very nice version of C that allowed you not only to run a co-operative multitasking environment, but also allowed you to embed assembler programs into the main C program. The whole kit was about £100, which I thought was very good value for money. Armed with this I managed to write a program that successfully took signals from the receiver and then controlled the two motors according to the position of the forward/backward and left/right joysticks.During my search for parts, one site claimed to sell motors that would be suitable for robot wars at a very low price. Since Bosch motors were going to cost me about £90 each, these alternative ones at £12.50 seemed good value for money. I was a bit suspicious though because they didn't quote the power of the motors, but simply said they were "exceptionally powerful ferrite magnet motors." When I received them and connected them to a battery, they didn't impress me. They didn't seem to have any real power behind them, and I could very easily stop the shaft turning with my hand. When I connected them to a 24 volt supply they seemed better, but I still wasn't convinced.
Motor drive prototype circuit
All that aside, they did allow me to check out the motor drive circuit. On the first iteration of the power driving circuit, I blew up half the power MOSFETs. On close examination I spotted the design flaw, and with a new set of transistors, the second version worked well. The transistors didn't get the slightest bit warm because they were rated at 40 amps continuous and all the motors could pull was 7 amps, so I was well over speced!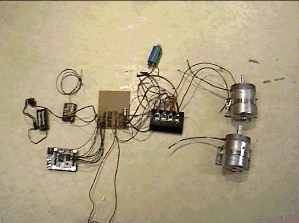 |
This is what the prototype circuit looked like from radio receiver, to interface card, to micro-controller, to opto isolators, to MOSFETs, and finally to electric motors. It all looks like a load of spaghetti really! |
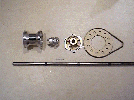
Go kart wheel design
I spoke with a couple of go kart suppliers to pick their brains about the construction of go kart axles, and what would be possible and sensible to do. I decided to go for four go kart wheels units and one shaft that I would cut into four parts. Some of the parts could be supplied second hand, and the others had to be new. It cost me over £100 from KR Karting, but the parts looked reasonably rugged.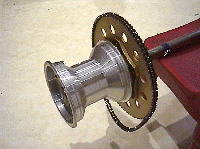 |
This is what one axle assembly looks like without the tyre. |
Wheel bearings
In the mean time I looked at the bearings I would use to mount the wheel axles on. The go kart guys suggested using plummer blocks because they would allow the bearings to move and settle in alignment with the axle. The first bearing company that came to mind was SKF. I found their web site and sent them an e-mail telling them that I was building a robot and asking them for a catalogue. A week later I received a phone call from one of their salesmen Steve saying that SKF might donate the bearing I wanted in exchange for me mentioning their name in the future. If I had a look through the catalogue he was about send me and then give me a call with the details, he would see what he could do. I couldn't believe my luck. To be offered sponsorship without even asking for it was a real bonus! But when you think about it, if they give away eight bearings, that is minuscule compared to the number of bearings they must sell per day, so it's no skin off their nose if they can get some cheap advertising out of it.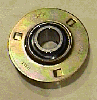 |
Here is one "plummer block" bearing assembly |
The main chassis
My initial thoughts for the robot body were to make a chassis out of square section metal tubing, and then at some later date decide what the shell shape would look like and build it around the chassis. I looked in the local telephone directory for metal suppliers and found there was one locally in Ditchling. I phoned them up and the guy there said he had all sorts of metal tubing that I could us, but asked what I wanted it for. When I told him it was for a robot, he said "Oh no! I'm making a robot as well." After that we had quite a long chat on the phone about various ideas before he said "drop by", and he would show me what metal he had or could get hold of.
When I finally got around to seeing him we spent quite some time talking over good and bad points of robot building. He suggested using rectangular section tubing rather than square section since it offered more strength along it's wide section than square section would. It turned out that he was no further on with building a robot than I was, but he had done some thinking about what would be a good idea. He said he had tried to find out what the rules and regulations were for entering a robot, but without much success. I loaned him the info I had from the Robot wars club, and in exchange he let me have some metal tubing and off-cuts at a much reduced rate. The guys name was Ian (or Lew, I couldn't quite fathom out which) and I think he might be a useful source of metal as well as metalwork advice.
Weaponry
After getting the main drive elements a bit clearer in my mind, I thought about what weaponry I should use. After some thought I abandoned any ideas of swinging axes or flailing weights as very few were effective in the battles that I had seen. The two weapons I though would be most effective were to have good traction and pushing power so that you could shove the opponent about and into the house robots who would finish them off, and a flipper to flip the opponent over or into the house robots. I felt the traction and power options I was hopefully addressing by using go kart wheels and powerful motors (but not the motors I first bought), but as far as the flipper was concerned, I had to do a bit of research. Most robot builders used pneumatics to operate the rams rather than hydraulics. Not having had much exposure to either in any great depth, I decided that pneumatics was probably the best route, partly because of the weight aspects of hydraulic pumps and reservoirs you would need, and partly because of the expense. Knowledge was not the issue, I had little knowledge in either camp.
Pneumatic gas bottles
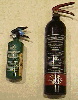
I decided to look for suitable gas cylinders for keeping the compressed air (or CO2) in. Popular containers were old fire extinguisher bottles, so I surfed the Internet and sent of a few e-mails to some companies begging for old cylinders. Pyrotec replied and asked where I lived. When I told them Hassocks, they said one of their guys lived there and would drop a few old bottles off that night. They left two CO2 bottles, and one smaller fire extinguisher bottle. The CO2 bottles could store pressures up to 200 bars, which was above what the Robot wars regulations allowed, but this would be ample safety margin, although the cylinder was a bit big. The smaller bottle could handle pressures up to 20 bars, which might be a bit small for a decent flipper.
There seemed to be several ways of using the gas to operate the rams, some more effective that others. Many used regulators to reduce the high pressure stored in the cylinders down to the level required by the rams. This, however, means that the rams generally operated slowly because the regulators can't cope with a sudden flow of air to the rams. I felt that this might be a disadvantage because an opponent may be able to escape from you before you managed to flip it over. Other robot builders (notably Chaos 2) doesn't use regulators, but simply vents the full pressure into the rams. You have to ensure the rams can take this pressure, but that being the case, you have a very fast acting flipper. One penalty of this is that you stand a very high chance of frostbite from the pneumatic components as the gas expands. You also stand the risk of frost bursting your pneumatic seals, but that's the risk you take! You need a large high-pressure container to do this, so I may opt for using the larger CO2 cylinders I've got rather than the small one.
Pneumatic rams
Rams were the next items to obtain, so I again surfed the Internet and located a few likely suppliers. I fired off a few e-mails and had a reply from Peter at Southern Pneumatic Ltd in Slough, who said his company normally made rams to order. He knew that in the stores at the moment there were some rams that were made to the wrong dimensions that he would probably never sell. He said he would have a look to see what was there, and if he found them and they were about what I was looking for, would let me have them. He said to phone him back later in the week to check it out.
Gel type batteries
I needed some batteries to power the robot, but they have to be gel electrolyte type batteries so that if they get damaged they don't spill acid over all and sundry. I also wanted to over-drive the motors by running them at 24v instead of 12v, thereby giving (in theory) a four fold power increase. Looking around there were various suppliers, each with different prices. After sending out a few e-mails to find out which ones were approved for Robot Wars, Steatite seemed to have the batteries I wanted. They had the Amp hour ratings I thought I needed (17AH), and were the cheapest ones around at £20 each including delivery. When I approached them they said they could order the batteries, but they would take 6 to 8 weeks to arrive from the USA, and the minimum order quantity was ten! After pleading my case, they agreed to supply just two 12v batteries, and set the gears in motion for ordering the from the USA. I guess I will just have to sit it out now, hoping that these batteries match my expectations.