June 2002
Sunday 2nd June 2002
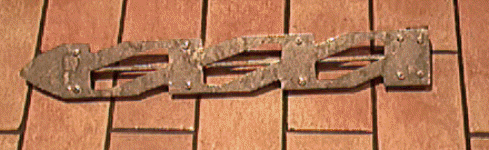
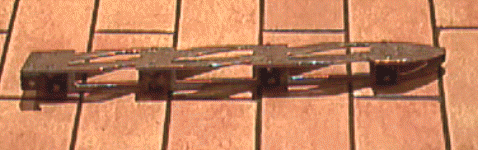
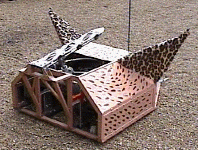
| I cut some more metal out from the
Hog's tails to try and lighten the load, and managed to make it look
a bit like a curly tail into the bargain. You may have to squint a bit, but at least I think it looks a bit more interesting that it used to be, and I must have removed about a third of the weight! |
 |
 |
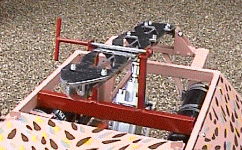
Monday 10th June 2002
| The high-pressure relief valve arrived today from technobots, which was a nice compact unit that would hopefully not increase the Hog's weight by too much. Here you can see it in place on the right hand side. The small black cylinder is the 10 bar regulator normally fitted to paint ball guns. | 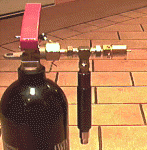 |
When I put the Hog on the scales I read off 101.5kg, which was a bit disappointing. I had, however, recently ordered a couple of narrower wheel rims (110mm) that should reduce the weight a bit, but I still think I need to get rid of a bit more material. I scrutinised the Hog's metalwork and thought I could hack a bit of metal off the motor mounting brackets. These were 6mm thick aluminium plates, and I managed to cut off a 3cm strip from both sides that lost me 0.25kg.
I spotted a couple more bits that I could remove so kept the hacksaw warm by hacking these off too. If I keep this up I will just get the weight down to between 100 and 101kg, which will hopefully be enough to keep the judges happy. It seems that the judges will give you be benefit of the doubt if you are just under 101kg, on the assumption that there may be a variation of 1kg between their scales and yours. It's not a good thing to count on, but for the moment I don't want to loose any more components or protective panel unless I REALLY need to.
Wednesday 12th June 2002
The new narrower wheel rims arrived from ZipKart. They were 110mm wide rather that the 120mm ones I previously had, but the 10mm made all the difference. It took me a fraction of the time to get the tyres on the rims and then to inflate them. I had no problem this time getting the tyre rims to seal, thanks to Karl's recommendation of loads of WD40, and the narrower rims themselves.
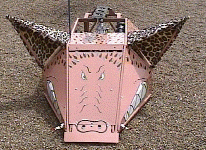
I also continued to give the body panels a coat of paint. Most of the panel were now undercoated, and I had given the tusks a top coat of white paint. Just to add a bit or realism I painted a few red dribbles running down the tusks that made it look a bit gory.
| The Hog's new face paint too, was coming on quite well. |  |
Friday 14th June 2002
I received confirmation from Robot Wars about the qualifying event. It was due to take place in Bingham Nottingham where the arena would be built in an RAF hanger. Qualifying rounds were taking place over a three day period from 3 to 5 July. I originally had a slot on Wednesday 3rd, but was able to move this to Friday 5th because of a clash with a work commitment (lucky me!)The qualifying event consisted of a technical assessment of the robot that included a weigh-in and safety check. Your team would be photographed with the robot, and then you would be interviewed, presumably to gather some background info about you and the robot. If the robot passes the technical evaluation, you are then allowed to battle against three other robots. The winner of this battle goes through to the competition proper. However, Robot Wars reserve the right to put forward robots that don't win their battle, if the think they have some special entertainment value. If I don't get in by winning my battle, I'm hoping I can get through just on the robot looks!
Wednesday 19th June 2002
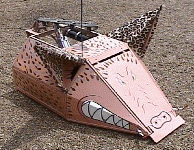
To give me a break from the painting, I decided to build a safety clamp to hold the flipper closed. This is one of the compulsory requirements for any weapon, and must either protect sharp objects, or hold moving items such as flippers in a locked position.
| For my flipper I decided to have two bolts through the end of the flipper that would screw into a metal bar running underneath the chassis. At the ends of the bar I put some shields that would cover the tusks so that my flipper restrain would have a dual purpose. I had chosen to have two bolts so that they would go through the two nostrils I had painted on the end of the flipper! | 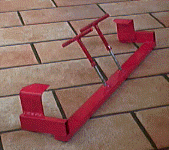 |
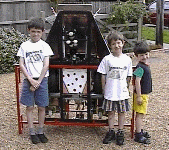
Saturday 22nd June 2002
By the end of the week I had just about finished the paint job, and was able to fit the panels onto the robot. I had painted the panels that covered the side wheel bearings, but if my Argos digital scales are accurate, I may have to replace the panels with fury cloth after the weigh-in because the Hog weighs just over 101kg. I will leave the panels on for the moment, but these will be the first panels to get the chop if I am overweight at the qualifying event.
 The Hog's bare backside! |
 What big furry ears you have! |
 Gruesome grin |
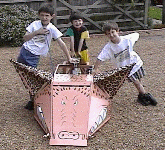
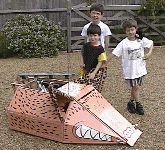 Relaxing with the Hog |
 Don't look, he's got no trousers! |
 Stay clear of the teeth! |
I took the Hog to the local infants school playground for a bit more driving practice. It had been a few weeks since I had had the chance to drive it because of one thing or another. Part way through the test drive, one motor seems to stop working and the Hog simply span around one wheel. When I had a look under the bonnet, I could smell the MOSFETS getting hot. The cables to the motor were hot too, and my first thought was that the motor controller had burnt a few MOSFETS out! After a bit of unsuccessful poking about on the circuit board, I decided to check the wheels were free. The one that wasn't working was stuck solid, and after a closer inspection, I noticed the chain was riding over the top of a few sprocket teeth. The problem was that the chain had become slack (through stretching, or movement of the wheel mounting plates) and started to ride up on the teeth, until it reached a point where it got jammed. I tried to adjust my chain tensioner, but it was right at the end of its travel. However, I was able to free the wheel and push the Hog back home where I elongated the tensioner slots, giving it enough extra movement to tighten the chain once more.
Prior to the wheel locking up, I had checked the Hog could self-right too. It self righted most of the time, but occasionally just sat there on its back making groaning noises. This may be because of the extra weight I am now carrying with the cladding. Previously the self righting tests had been done without the cladding, so maybe this had just put it over the limit. It could also be because the regulator is drifting a bit like it has done in the past. Alternatively it could be because I can't fully refill of my CO2 gas bottle, as my main filling bottle was almost empty. I was a bit suspicious about how effective it was at giving me a full refill anyway, so I have been making enquiries about getting a larger bottle from another gas supplier called Linde. These were the people "Life Support Services" recommended, and they said they have no problems getting a full charge from these larger bottles. Since my smaller bottle is now empty, I may give the larger bottles a go.
Sunday 23rd June 2002
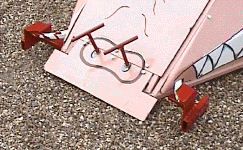
I had a go at making a restraining clamp for the self righting tail. There were a few ways of doing it, but I went for the solution where the restraint fitted under each side members of the chassis, and then had a bolt going over the top of the tail. It's a lot easier to show a picture of the device than it is to describe it, so here are a few pictures of the finished front and tail clamps!
 The Hog's snout is clamped! |
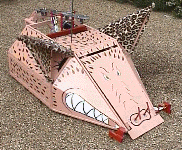 Both clamps in place |
 The tail is held down |
You may also notice the shinny tail in the photo. After I spent an hour or so with the Autosol metal polisher, the tail looked a whole lot better than it did before, but only if you don't get too close.