April 2003
Saturday 5th April 2003
After wiring up power cables between the motors, battery, and motor controller, I connected the aerial to the motor controller so that I was in a position to check the complete drive system. To my relief the robot moved along the graveled driveway at quite a pace, and after feeling the MOSFET heatsinks, things seemed to be coping well with the load.
After a couple of minutes, disaster struck as one wheel stopped turning. Thoughts of blown MOSFETs first came to mind because I was over driving the Bosch 630 watt 12v motors at 24 volts. The stall currents were supposed to be quite high and I was worried that the MOSFET bricks might not be able the handle this. I swapped a few leads around and proved that both MOSFET bricks were still working okay. I then looked closer at the mechanics of the drive assemblies and noticed that the motor shaft was turning even though the drive sprocket wasn't. It transpired that the two grub screw that locked the sprocket onto the motor shaft had shaken loose, and the sprocket was just slipping on the shaft. I tightened the screws back up and all was all right again.
I drove the hog around the driveway for a few more minutes, pushing an old tyre about fairly successfully. However, the grub screws on both drives shook loose a couple of time more, so I will have to look at ways of ensuring they remain tight. Maybe if I put a "dimple" in the shafts so the screws lock into these, it might work. I will give it a bit of thought over the next few days.
Sunday 6th April 2003
Today was a mixture of success and disaster!
The successful part was updating the controller software so that I could operate the new pneumatics. The original software was written to operate the Hassocks Hog 1 pneumatics that consisted of a flipper and self righting tail. I now only had a flipper that doubled up as a self righter, which left me with a spare switch on the radio gear that I had decided to use as a "flipper mode" selector.
Under a "fast flipper mode" I wanted to use one joystick in such a way that when it was fully up, I would vent the top outlet of the ram to the atmosphere while supplying gas to the bottom inlet via the high flow rate valve. This would open the flipper at full speed and give me the best performance from the flipper.
When the joystick was then put to the centre position, both ram ports would be vented to the atmosphere thereby allowing the flipper to close under gravity. This would result in using half the gas I would have used had I driven the flipper closed with gas, thereby doubling the number of flips I could get from the gas bottle. After the flipper had closed and was fully down, I could sense this via a micro switch and would switch the valves to prepare for a fast opening flip again.
If I pushed the joystick fully down this would force the flipper down by feeding gas into the top of the ram. I would use extra gas, but would be able to close the flipper a lot quicker than under gravity. In some circumstances it might be an advantage to "quick fire" the flipper to get a number of quick flips on an opponent.
The other flipper mode I could select was "slow flipper mode". Here I would use the conventional 5/3 valve to power the flipper up and down, but when the joystick was in the centre position, the flipper would be held were it was. The flow of gas would be restricted a bit so I would have some degree of control over the position of the flipper.
The disastrous bit of news came about while checking the new software and trying to be too clever. I thought that even though the changes to the software were comparatively simple, I didn't want to risk blowing up the MOSFETs should I have inadvertently upset a bit of the motor controller routines. I therefore decided to disconnect the signal wires from the motor controller to the MOSFET bricks, thereby preventing them switching on and potentially shorting out the power rails (the classic shoot-through scenario).
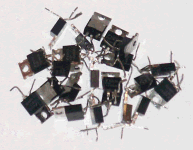
What I also should have done was to disconnect the +24 volt supply to the MOSFET bricks, because as it turned out, the loose signal wires picked up some stray interference from the valve solenoids and switched all the MOSFETs on at the same time. The result was the motors twitching just before the horribly familiar burning smell of semiconductors and electrical wires. I only realised after the event what had happened, and for the sake of 20 pence worth of pull-down resistors on the signal wires, I could have saved myself the cost of 22 blown MOSFETs. Luckily the MOSFETs had been donated by Fairchild, but nonetheless it was depleting my store of components a bit.
The really sad thing was that had I left the signal wire
connected, nothing would have blown. Despite the disappointment of the
smoldering components, the pneumatics operated as expected in both "fast
flipper mode" and "slow flipper mode".
I will be spending the next few
evenings dismantling the MOSFET bricks and replacing the components, as well as
adding a few suitably positioned pull down resistors to ensure that the MOSFETs
remain off should the signal wires become disconnected again in the future.
Wednesday 9th April 2003
|
Over the last three nights I have been painstakingly
swapping out all the blown MOSFETs from my motor controller, as well as putting
on some gate pull-down resistors. The job isn't particularly difficult, but it
needs a bit of concentration. In all I had to replace 22 MOSFETs that had
blown. |
 |
Thursday 10th April 2003
|
Having finished replacing the MOSFETs, I turned my attention to the motor drive shafts locking screws that kept coming loose. The end of the screws were conical shaped, so I decided to drill a little dimple on the shaft for each screw to seat into, and hopefully remain in place. |
 |
Saturday 12th April 2003
The moment of truth had arrived after a weeks worth of work putting the MOSFET bricks back together. I did as much testing as I could on the motor controller and bricks before connecting everything back together and then checking nothing blew up again. I was greatly relieved to find everything working fine, and even the motor shaft grub screws stayed in place.
What I was missing now was the high flow rate CO2 regulator, and a new gas bottle. I had found out that the new rules for series 7 (yet to be officially released) now only allowed gas bottles with screw type valves, not squeeze grip valves like the ones I currently have. This is a bit of a pain, but luckily Jim from Life Support Services had managed to procure a suitable valve, and had modified it with the safety burst disk that the rules also stipulated.
All I was waiting for now was for them to be delivered!
Thursday 17th April 2003
|
Jim from Life Support Services dropped by today with my new
custom built regulator, buffer bottle, and gas reservoir. The regulator was
quite a piece of engineering and included the 1000psi high pressure relief
valve, a burst disk, a filler connections, a screw valve, a pressure gauge, and
a number of spare outlet ports. |
||
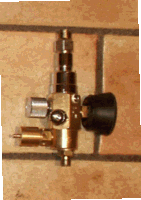 16 bar gas regulator |
 1 litre buffer bottle |
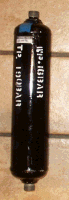
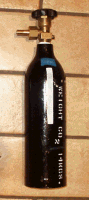 1.1kg CO2 gas bottle |
Saturday 19th April 2003
I was keen to try out the flipper now that I had the new regulator but hadn't quite figured out where to mount the new gas bottle or regulator. I had also just been given permission to use the local school playground and was keen to give the hog a quick test drive. I therefore decided to connect the gas cylinder and regulator to the Hog using a very long length of pneumatic piping. This would allow me to have the bottle resting on the floor while I drove the hog in a 20 foot radius around it.
The first thing I did was to wheel the Hog 1 out of the garage and try to flip in around the driveway with Hog 2. You can see the results by either looking at the video clips page, or clicking here.
With some good flipping under my belt, I then pushed the hog to the playground where I ran it around the playground for a good 25 minutes. The batteries were still running by then, but were just starting to show signs of needing a charge, so I pushed it back home, feeling happy with the days outcome.
Sunday 20th April 2003
|
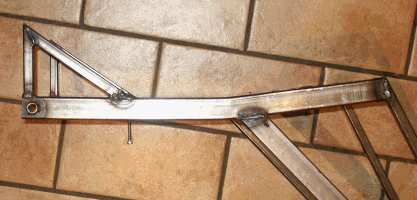
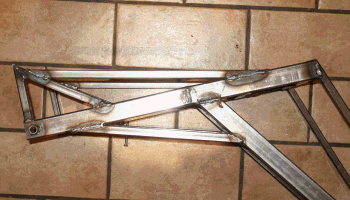
I decided to have a look at where I would mount the gas bottle when I noticed that the flipper was not fitting as well as I thought it should. On closer inspection I noticed that the top cross members were a bit bent. Initially I thought they were bent because of all the flipping Hog 1 I had done the previous day. However, the bends were in the wrong direction, which led me to the conclusion that the bends were brought about not because of lifting heavy weights, but by the sudden stop when the flipper reached the top of its travel. |
 |
|
I decided to add a few extra cross members around the strut to absorb the whiplash effect I was getting. I used triangulation as much as possible, so with any luck, this will do the trick. |
 |
Sunday 27th April 2003
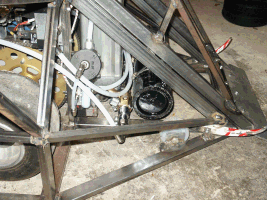
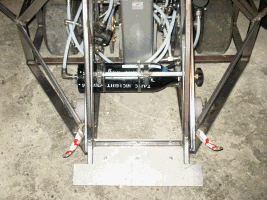
I spent a bit of time playing about with positioning the gas bottle and regulator. In the end I finally came up with the gas bottle laying sideways across the front of the hog just under the flipper, and the regulator laying just behind it bolted to one of the ram bottom mounting struts. There were very few places where the regulator would be shielded from enemy blows, but this seemed to be the best compromise. After having bolted everything together I put the Hog on my bathroom scales to see how much weight I had left for cladding. It weighed 94kg, which leaves me with about 6kg for cladding. Not much to play with, so I will have to work out what thickness of poly carbonate I can get away with.
 Side view of gas bottle and 16 bar regulator |
 Gas bottle mounting bar |